프로그램 (PHP,Python)
AI끼리 말하는 멀티에이전트 시스템 A2A-ADK-MCP 날씨봇 만들기 (All-in-One)
날으는물고기
2025. 4. 26. 01:02
728x90
A2A-ADK와 MCP(Model Context Protocol)를 통합하여 지역별 날씨 정보를 조회하는 시스템을 구축하는 예시를 통해, 전체 구조와 흐름으로 종합적인 체계를 비개발자도 이해할 수 있도록 단계별로 안내합니다.
🧠 1. 핵심 개념 정리
🔹 A2A-ADK란?
- A2A(Agent-to-Agent) 통신을 위한 개발 키트로, 여러 AI 에이전트가 서로 협력하여 작업을 수행하도록 설계된 프레임워크입니다.
- 각 에이전트는 고유한 역할을 가지고 있으며, 복잡한 문제를 분산적으로 해결합니다.
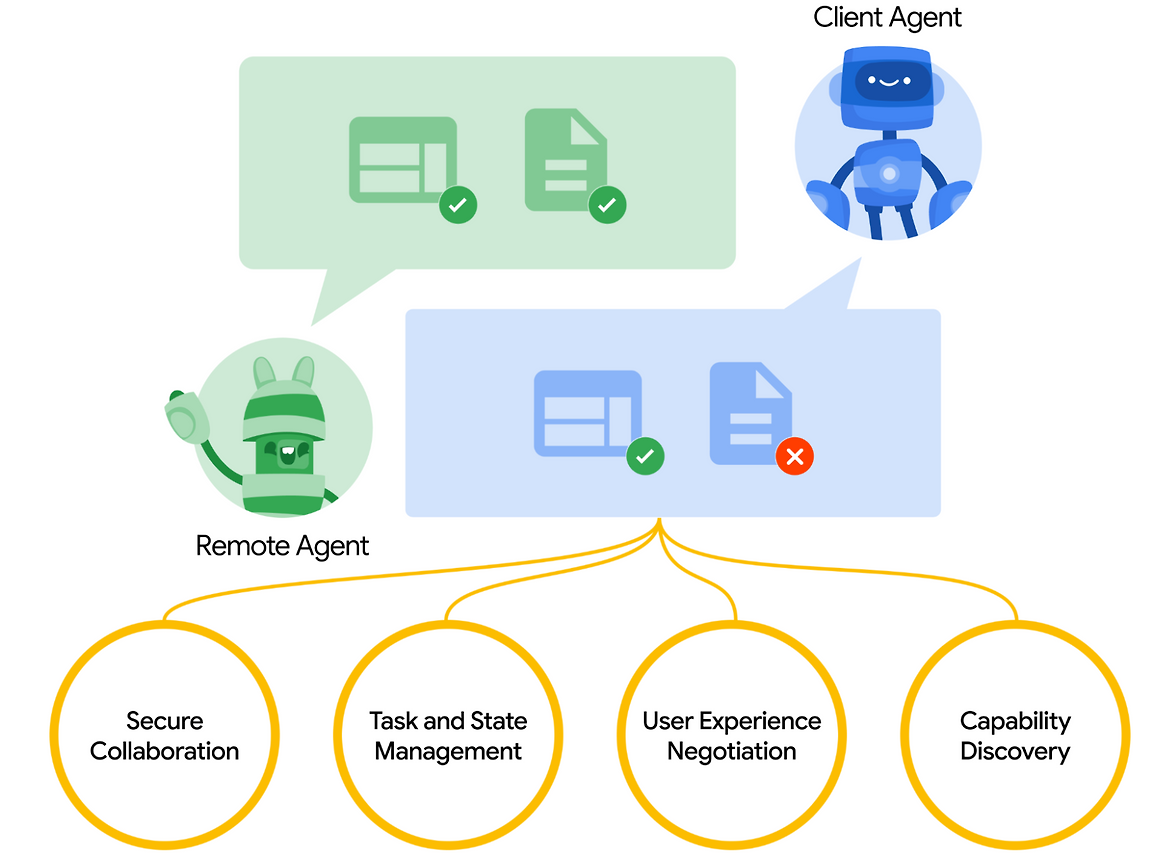
Google for Developers - How A2A works
🔹 MCP란?
- Model Context Protocol의 약자로, 각 에이전트가 작업 전후에 문맥(Context) 을 공유하여 더 정확하고 일관된 응답을 하도록 돕는 에이전트 간 협업 표준입니다.
- ADK의 세션 흐름에 따라 각 모델이 언제 어떤 문맥을 받아야 하는지를 정합니다.
🌤️ 2. 실전 예시: “지역별 날씨 정보 조회” 시스템
🎯 목표
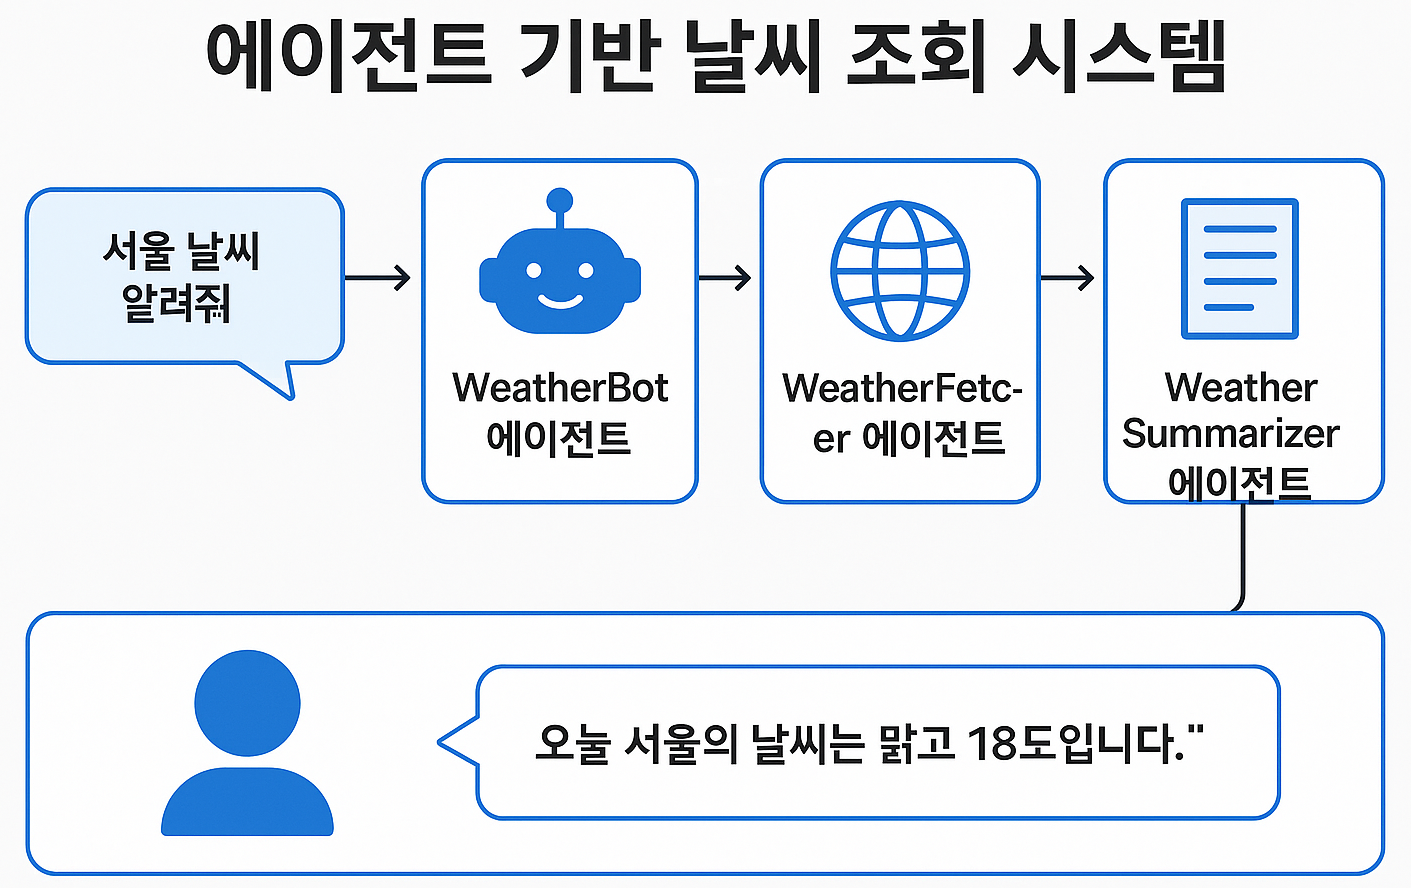
사용자가 “서울 날씨 알려줘”라고 입력하면, ADK 기반 에이전트들이 협력하여 실시간 날씨 데이터를 수집하고 요약하여 알려줍니다.
🏗️ 3. 시스템 구성도
User Request ("서울 날씨 알려줘")
      │
      ▼
[1] WeatherBot Agent (ADK)
     │
     ├─> [2] LocationParser Agent: "서울"을 지역 정보로 파싱
     ├─> [3] WeatherFetcher Agent: OpenWeatherMap API로 데이터 요청
     └─> [4] WeatherSummarizer Agent: 응답을 자연어로 정리
      │
      ▼
  ✅ 최종 응답 ("오늘 서울의 날씨는 맑고 18도입니다.")
⚙️ 4. A2A-ADK & MCP 통합 흐름 설명
🧩 [1] WeatherBot Agent 생성 (Entry Point Agent)
- 역할: 사용자 요청을 이해하고 하위 에이전트들에게 적절한 역할을 분배
- ADK 설정 예
from a2a import Agent class WeatherBotAgent(Agent): def plan(self, user_input): return [ {"agent": "LocationParserAgent", "input": user_input}, {"agent": "WeatherFetcherAgent"}, {"agent": "WeatherSummarizerAgent"} ] - MCP Hook 예
def before_tool_callback(tool_input, context):
    context["session_location"] = extract_location(tool_input)
    return tool_input, context
📍 [2] LocationParser Agent
- 목적: 사용자 입력에서 지역명을 파악
- 예시 입력:
"서울 날씨 알려줘" - 출력:
"서울"
class LocationParserAgent(Agent):
    def run(self, input_text):
        # 간단한 지역명 추출 예시
        locations = ["서울", "부산", "대전", "대구"]
        for loc in locations:
            if loc in input_text:
                return loc
        return "서울"
🌐 [3] WeatherFetcher Agent
- 목적: OpenWeatherMap API를 호출하여 날씨 정보 가져오기
import requests

class WeatherFetcherAgent(Agent):
    def run(self, location):
        api_key = "your_api_key"
        url = f"https://api.openweathermap.org/data/2.5/weather?q={location}&appid={api_key}&lang=kr&units=metric"
        response = requests.get(url).json()
        return response
🧾 [4] WeatherSummarizer Agent
- 목적: JSON 날씨 데이터를 자연어로 요약
class WeatherSummarizerAgent(Agent):
    def run(self, weather_json):
        description = weather_json["weather"][0]["description"]
        temp = weather_json["main"]["temp"]
        city = weather_json["name"]
        return f"오늘 {city}의 날씨는 {description}이고, 기온은 약 {temp}도입니다."
🔐 5. 보안 및 운영 고려사항
✅ API 키 관리
.env파일이나 Secret Manager를 통해 외부 노출 방지- ADK에서는
secrets={"WEATHER_API_KEY": "..."}구조로 별도 전달 가능
✅ 입력값 검증
- 위치명 필터링 및 예외처리 필수 (악의적 입력 방지)
✅ 요청 기록 관리
- 세션 context와 MCP를 이용해 사용자의 연속 질문에 대한 대응 가능
- 예: "부산은 어때?" → 이전 Location을 저장해 문맥 이해
✅ 응답 캐싱 전략
- 같은 지역에 대한 반복 요청 시 API 호출 최소화
🧪 6. 활용 시나리오 및 확장 예시
| 기능 확장 | 설명 |
|---|---|
| ☔ 주간예보 추가 | 7일 예보 API 연동 |
| 📍 다국어 지원 | Agent에 언어 감지 및 번역 기능 추가 |
| 📅 캘린더 통합 | 사용자의 일정과 연동하여 우산 챙김 리마인더 |
| 🔔 알림 설정 | 특정 날씨 조건 시 Slack/메일/앱 푸시 발송 |
🧠 7. 마무리 정리
| 구성 요소 | 설명 |
|---|---|
| ADK | Agent 간 계획 수립 및 실행 흐름 담당 |
| MCP | 세션 상태 유지 및 문맥 공유를 통해 자연스러운 대화 지원 |
| WeatherBot 예시 | 사용자-에이전트 협업으로 복합 기능 수행의 좋은 모델 |
✍️ 추가 팁
- A2A-ADK는 Agent 수가 많아질수록 분산적인 처리 전략, 트래픽 분산, 메시지 큐 연동(RabbitMQ/Kafka) 등의 확장이 가능합니다.
- 실제 운영 시에는
LangGraph,LangChain,LlamaIndex등의 프레임워크와 병행 사용하여 Agent Flow를 시각화하거나 저장할 수 있습니다.
300x250
A2A-ADK와 MCP를 통합하여 지역별 날씨 정보를 조회하는 시스템을 로컬에서 바로 실행할 수 있는 구성입니다.
🧰 구성 요소
docker-compose.yml– 전체 서비스 구성 (FastAPI, Redis, MCP 등)fastapi_app/– MCP 서버 및 API 엔드포인트agents/– 각 역할별 Agent (Parser, Fetcher, Summarizer).env– API 키 및 설정
🐳 1. docker-compose.yml
version: '3.9'

services:
  redis:
    image: redis:7
    ports:
      - "6379:6379"

  mcp-api:
    build: ./fastapi_app
    ports:
      - "8000:8000"
    environment:
      - REDIS_HOST=redis
      - WEATHER_API_KEY=${WEATHER_API_KEY}
    depends_on:
      - redis

  adk-runner:
    build: ./agents
    depends_on:
      - redis
🗂️ 2. 디렉토리 구조
project-root/
├── docker-compose.yml
├── .env
├── fastapi_app/
│   └── main.py
├── agents/
│   ├── weather_bot.py
│   ├── location_parser.py
│   ├── weather_fetcher.py
│   └── weather_summarizer.py
🔐 .env (실제 API 키 입력)
WEATHER_API_KEY=your_openweather_api_key_here⚙️ 3. FastAPI + MCP 서버 (fastapi_app/main.py)
from fastapi import FastAPI, Request
import redis
import os
import json

app = FastAPI()
r = redis.Redis(host=os.getenv("REDIS_HOST", "localhost"), port=6379, decode_responses=True)

@app.post("/weather")
async def query_weather(request: Request):
    data = await request.json()
    user_input = data.get("query", "")
    r.set("user_query", user_input)
    return {"status": "Query received"}

@app.get("/context")
def get_context():
    context = {
        "query": r.get("user_query") or "서울 날씨 알려줘"
    }
    return context
🤖 4. Agent 템플릿 (예: agents/weather_bot.py)
from a2a import Agent, run_agents
import os
import requests

class LocationParserAgent(Agent):
    def run(self, input_text):
        for loc in ["서울", "부산", "대전", "대구"]:
            if loc in input_text:
                return loc
        return "서울"

class WeatherFetcherAgent(Agent):
    def run(self, location):
        api_key = os.getenv("WEATHER_API_KEY")
        url = f"https://api.openweathermap.org/data/2.5/weather?q={location}&appid={api_key}&lang=kr&units=metric"
        return requests.get(url).json()

class WeatherSummarizerAgent(Agent):
    def run(self, data):
        desc = data["weather"][0]["description"]
        temp = data["main"]["temp"]
        city = data["name"]
        return f"오늘 {city}의 날씨는 {desc}이고, 기온은 {temp}도입니다."

class WeatherBotAgent(Agent):
    def plan(self, user_input):
        return [
            {"agent": "LocationParserAgent", "input": user_input},
            {"agent": "WeatherFetcherAgent"},
            {"agent": "WeatherSummarizerAgent"}
        ]

if __name__ == "__main__":
    agents = [
        WeatherBotAgent("WeatherBotAgent"),
        LocationParserAgent("LocationParserAgent"),
        WeatherFetcherAgent("WeatherFetcherAgent"),
        WeatherSummarizerAgent("WeatherSummarizerAgent")
    ]
    # 예시 입력
    run_agents(agents, "서울 날씨 알려줘")
run_agents()는 순차적으로 agent들을 호출하고, plan에 따라 자동 실행을 이어나갑니다.
🧪 5. 로컬 실행 방법
# 환경 설정
cp .env.example .env

# 실행
docker-compose up --build

# 테스트
curl -X POST http://localhost:8000/weather -H "Content-Type: application/json" -d '{"query":"서울 날씨 알려줘"}'
🛡️ 6. 보안/운영 가이드
- 🔑
.env파일은.gitignore로 포함 - 🔒 Redis는 외부 노출 방지 (내부 네트워크 통신만)
- 🛠️ MCP 서버 FastAPI는
/weather,/context등의 경량 API로 분리 관리 - 📊 추후 OpenTelemetry 연동으로 트레이싱 및 로그 기록 가능
🔄 확장 아이디어
n8n연동 → FastAPI에 Webhook 설정 후 자동화- GPT 모델 연동 → 날씨 외 질문도 대응하는 다중 Agent 설정
- 대화 상태 관리 → Redis 기반 세션 확장
A2A-ADK + MCP 기반 지역 날씨 조회 에이전트 시스템을 로컬에서 실행하고 학습하거나 확장할 수 있도록 GitHub 템플릿 형태로 구성할 수 있습니다.
🌐 GitHub 템플릿 구조
a2a-weather-agent-template/
├── .env.example
├── docker-compose.yml
├── README.md
├── fastapi_app/
│   ├── Dockerfile
│   └── main.py
├── agents/
│   ├── Dockerfile
│   ├── weather_bot.py
│   ├── location_parser.py
│   ├── weather_fetcher.py
│   └── weather_summarizer.py
📘 1. README.md
# 🌦️ A2A Weather Agent with MCP (FastAPI + Redis)

이 프로젝트는 A2A Agent Development Kit(ADK)와 MCP(FastAPI 기반 문맥 서버)를 사용하여 **지역별 날씨를 알려주는 에이전트 시스템**입니다.

## 📦 구성
- FastAPI MCP 서버
- Redis (문맥 저장소)
- A2A 에이전트들 (LocationParser, WeatherFetcher, Summarizer)

## 🚀 실행 방법
```bash
# 환경 변수 파일 복사
cp .env.example .env

# 도커 실행
docker-compose up --build
```

## 🌐 테스트 예시
```bash
curl -X POST http://localhost:8000/weather \
  -H "Content-Type: application/json" \
  -d '{"query": "서울 날씨 알려줘"}'
```

## 🔗 참고
- [A2A-ADK GitHub](https://github.com/google/adk-python)
- [OpenWeatherMap API](https://openweathermap.org/api)
🔐 2. .env.example
WEATHER_API_KEY=your_openweathermap_api_key🐳 3. docker-compose.yml
version: '3.9'

services:
  redis:
    image: redis:7
    ports:
      - "6379:6379"

  mcp-api:
    build: ./fastapi_app
    ports:
      - "8000:8000"
    environment:
      - REDIS_HOST=redis
      - WEATHER_API_KEY=${WEATHER_API_KEY}
    depends_on:
      - redis

  adk-runner:
    build: ./agents
    depends_on:
      - redis
    environment:
      - WEATHER_API_KEY=${WEATHER_API_KEY}
⚙️ 4. fastapi_app/Dockerfile
FROM python:3.10

WORKDIR /app
COPY main.py .
RUN pip install fastapi uvicorn redis

CMD ["uvicorn", "main:app", "--host", "0.0.0.0", "--port", "8000"]
🌐 5. fastapi_app/main.py
from fastapi import FastAPI, Request
import redis
import os

app = FastAPI()
r = redis.Redis(host=os.getenv("REDIS_HOST", "localhost"), port=6379, decode_responses=True)

@app.post("/weather")
async def post_weather(request: Request):
    data = await request.json()
    user_query = data.get("query", "서울 날씨 알려줘")
    r.set("user_query", user_query)
    return {"message": "Query saved"}

@app.get("/context")
def get_context():
    return {"query": r.get("user_query") or "서울 날씨 알려줘"}
🤖 6. agents/Dockerfile
FROM python:3.10

WORKDIR /app
COPY . .
RUN pip install a2a requests

CMD ["python", "weather_bot.py"]
🤖 7. agents/weather_bot.py
from a2a import Agent, run_agents
import os
import requests

class LocationParserAgent(Agent):
    def run(self, text):
        for loc in ["서울", "부산", "대전"]:
            if loc in text:
                return loc
        return "서울"

class WeatherFetcherAgent(Agent):
    def run(self, location):
        key = os.getenv("WEATHER_API_KEY")
        url = f"https://api.openweathermap.org/data/2.5/weather?q={location}&appid={key}&lang=kr&units=metric"
        return requests.get(url).json()

class WeatherSummarizerAgent(Agent):
    def run(self, data):
        desc = data["weather"][0]["description"]
        temp = data["main"]["temp"]
        city = data["name"]
        return f"오늘 {city}의 날씨는 {desc}, {temp}도입니다."

class WeatherBotAgent(Agent):
    def plan(self, user_input):
        return [
            {"agent": "LocationParserAgent", "input": user_input},
            {"agent": "WeatherFetcherAgent"},
            {"agent": "WeatherSummarizerAgent"}
        ]

if __name__ == "__main__":
    agents = [
        WeatherBotAgent("WeatherBotAgent"),
        LocationParserAgent("LocationParserAgent"),
        WeatherFetcherAgent("WeatherFetcherAgent"),
        WeatherSummarizerAgent("WeatherSummarizerAgent")
    ]
    run_agents(agents, "서울 날씨 알려줘")
✅ 배포 방법
이제 다음 명령어로 로컬에서 테스트 가능
docker-compose up --build📦 GitHub 템플릿 생성
이 프로젝트를 GitHub 템플릿으로 만들고 싶으시면, 다음 단계를 따르면 됩니다.
- GitHub에 새 저장소 생성 → 예:
a2a-weather-agent-template - 위 구조에 맞게 파일 업로드
- 저장소 설정에서 “Template repository” 체크박스 활성화
728x90
그리드형(광고전용)