Introduction
DoxBar is an add-in for using doxygen from within Developer Studio. The add-in has three functions:
- It can be used to run doxygen on the sources and header files of the current project and its dependencies. These are those sources and header files that are visible from the Workspace under the project whose name is displayed in bold.
- It can be used to automatically generate comments for common C++ code
- It can be used to open an external help file, by means of a button or key press, while searching for the current selection, the word under the cursor, or the current file name.
Licence
Copyright © 2000-2002 by Dimitri van Heesch.
Permission to use, copy, modify, and distribute this software and its documentation under the terms of the GNU General Public License is hereby granted. No representations are made about the suitability of this software for any purpose. It is provided "as is" without express or implied warranty. See the GNU General Public License for more details.
Download
The latest release of the add-in can be downloaded in source or binary form from the doxbar project page on sourceforge. Development sources can be obtained from the CVS repository using doxbar as the module name. This add-in has been tested under Windows XP Home edition and might not work under other windows platforms.
Requirements
To be able to use or compile the add-in, you need the following:
- Microsoft Visual C++ version 6.0.
- Boost Library (for compiling Regular Expressions)
- Microsoft's HTML help workshop (only for viewing/searching through external documentation and compiling the add-in).
- Doxygen for Windows
Installation
Do the following to install the tool:
- Start developer studio.
- From the "Tools" menu select "Customize...".
- Select the "add-ins and Macro Files" tab.
- Press "Browse" and select files of type "add-ins (.dll)".
- Browse to the location of doxbar.dll and press "open".
- The config menu should now look like this:
- Press "Close".
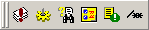
- A new toolbar should appear:
- From the "Tools" menu select "Customize..." again.
- Select the "Tools" tab and add a new item to the list called doxygen.
- Set the options as follows:

The batch file after command does not need to exist. It will be generated by DoxBar. To avoid a warning from developer studio you could create an empty batch file with that name, but make sure it is writable. For a convenient output, do not forget to check the Use Ouptut Window checkbox.
- Press "Close".
- Select the "Tools" menu again and remember the number of the user tool called doxygen. For a freshly installed developer studio it should be 6 or 7:

- Press the configure button of the DoxBar add-in (
 )
)

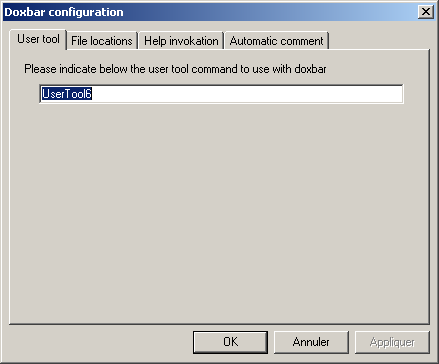
- In the "User tool" tab, fill the edit control with "UserTool<number>", where <number> should be the remembered number (e.g. 7).
- In the "File locations" tab

- For the "Batch file" fill in the same path and file as you did in the configure menu.
- Fill in (or browse to) the location of the doxygen executable.
- At the "Configuration template" field you may fill in (or browse to) a Doxygen configuration file. The settings in this file will be used as a template for the DoxBar tool. Some options (like INPUT) will be overwritten. You can run doxygen with the -g option to generate a template configuration file which you may want to place in a template subdirectory. If you lieve this field blank, you will be asked if you want to create one the first time you execute doxbar on the active project.
- Fill in (or browse to) the location of the HTML help compiler (this comes with the HTML Help workshop).
- In the "Help invokation" tab, fill in the informations according to the description done in the Using the HELP feature section
- In the "Auto comment" tab
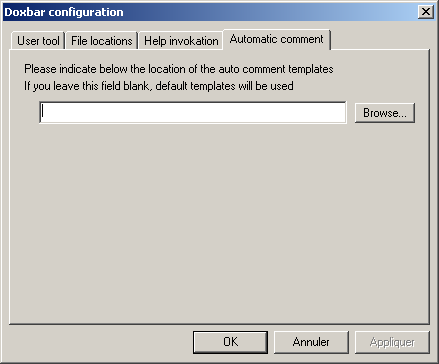
Indicate the path to the place of common comment templates. Please refer to Using the Auto Comment feature section for details
- Press "Ok". All settings will be stored in the system's registry.
Running doxygen
To run doxygen on a project do the following:
- Load the workspace/project
- Make the main project active (right click on the name, and select "Set as Active Project"). If the main project is not selected or the workspace name is not the same as your main project's, you will receive a warning stating that doxbar wasn't able to read the workspace file. You may choose to continue, but any dependencies will be discarded.
- Press on the Execute button of the DoxBar (
 )
)
- If you left the template field blank during setup, you will be asked if you want doxbar to create a template for you. You should answer Yes as this is the easiest way to get a valid project template.
- Doxygen should now start, dumping its output in the Output window under the doxygen tab. If you set the the profile entry WARN_FORMAT to '$file($line) : $text' you will be able to double click on a warning from doxygen to directly navigate to the incriminated file.
- After doxygen has completed the HTML Help compiler will compile a compressed HTML file of the result (unless you turned off this option).
Using the HELP feature
To start an external help file (for instance one that was generated with doxygen :-) do the following once:
- Press the configure button of the DoxBar add-in ()
- In the "Help invokation" tab

 )
)
- Fill in (or browse to) the help file that should correspond to this item. You can use the special strings %PROJECT_PATH% and %PROJECT_NAME% that will be respectively replaced by the active project's path and the active project's name (without path nor extension)
- Select one or more of the lookup boxes. Depending on what you want. The lookup will be done for all marked items in the order shown.
You may wonder why there is more than one help option while there is only one help button.
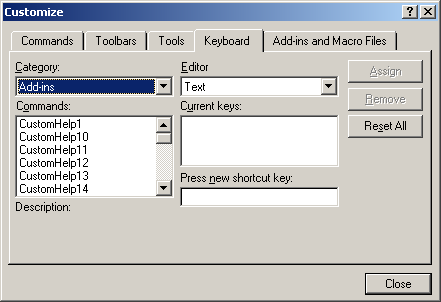
This is because all help options are available to developer studio. You can assign a key to any of them, by selecting "Customize..." from the Tools menu. Select the "Keyboard" and Category "Add-ins":
Using the Auto Comment feature
Position the caret on the line you want to be automatically commented and simply press the Auto Comment button ( ). Doxbar will analyse the line and will recognize class, function and typedef declarations. If none of these three are recognized, a default comment will be added.
In the doxbar and project options, you can indicate a path to comment templates. If you leave these fields blank, the running directory will be used. The used path will be searched for the following files:
- class.txt
- function.txt
- typedef.txt
- default.txt
These files should contain C++ comments with special tags that will follow these rules:
- In class.txt, %CLASSNAME% will be replaced by the name of the class
- In function.txt, %FUNCTIONNAME% will be replaced by the name of the function
- In function.txt, %FUNCTIONTYPE% will be replaced by the type of the function (the type of the value returned)
- In function.txt, the first line to contain \param or @param will be repeated for all the parameters with %PARAMTYPE% and %PARAMNAME% replaced by the type and name of the parameter
- In typedef.txt, %ORIGINALTYPE% and %NEWTYPE% will be replaced by the original type and the new type being defined
- In default.txt, no special tags will be replaced.
%DATE%=DateFormat=%DATE%
Where DateFormat is a valid format to pass to the strftime() standard function. Please see at this website for details: MSDN strftime() page
If one or more of these files is missing, the default templates will be used
Changing the settings of the project
Doxbar will generate a configuration file based on the template you indicated during setup, or the one generated by doxbar. If you want to alter the settings of this template click on the template button ( ). The following dialog will show up:
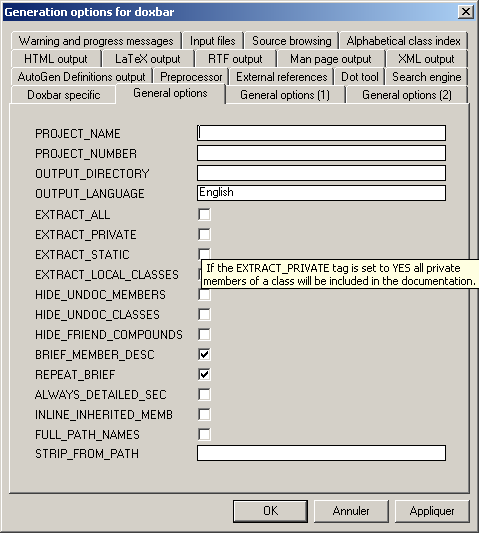
If you leave your mouse long enough on a entry zone, you will get, as on the picture, a tool tip message explaining what is the function of the zone. This only works if the template doxyfile contains comments. This is why you should let doxbar create a basic template and copy it in your project's directory.
All the tabs in this dialog are generated from the template file except the 'Doxbar specific' tab. This one contains project dependent options, specific to doxbar and changing the values of these options will not affect directly the way doxygen generates the documentation.
You can choose how doxbar explores the projects collection in the current workspace. Selecting 'the active project and its dependencies' requires that the workspace file (.dsw) is named the same as the active project file (.dsp). A warning will be issued if this is not the case.
You can also choose to force HTML and HTML Help outputs. It is recommanded to check those two options to get full use of doxbar.
Please note that the template changes are made on the project's doxyfile, not on the default template. Moreover, the doxbar specific settings are stored in a file named after the project's name but with the .dox extension, created in the project's directory.
Viewing the error log file content
If you indicated a file name in the WARN_LOGFILE of the configuration file, you can use the log button ( ) to display its content in the Macro tab of the Output window.
To allow a convenient navigation from the output window to the source it is necessary to set the profile entry WARN_FORMAT to '$file($line) : $text'
However, if you checked the Use Output Window check box during installation, this may not be really usefull as the generated output is already available in the Doxygen tab of the output window.
Acknowledgements
Special thanks go to:
- Dimitri van Heesch for Doxygen and starting this addin
- Mike Copperwhite for providing the help browser part of this add-in.
- Robert Radtke, Michael Beck and Pekka Pessi for the help leading to version 0.12
- Bernhard Nowara for creating version 0.14
- Olivier Sannier for restarting development of doxbar
원문 : http://doxbar.sourceforge.net/


댓글